Lightweight galleries with llgal

I’ve been meaning to install a gallery in this site for some time now. I’ve previously used and liked Zephoto. Nothing very new seems to have come up since then, apart from something like Piwigo.

Anyway, since Blosxom is the happiest experience I’ve had with a blogging engine, I was happy to come across an equally elegant solution for web galleries: llgal. This is just a single CLI that most distros ought to come with. Setup is mind numbingly easy, all I had to do was cd to the folder with pictures and type:

llgal —title="n900"

And that got me this gallery. Could anything be simpler? the only other thing I wanted was decent authentication. Well, I have an SSL cert for this site so Basic Auth + SSL could have been enough. Anyway, I decided to try out Digest Authentication this time. Configuration is as easy as it is for Basic. I used the Apache documentation as a reference and didn’t face any problems.

So there it is. A light-weight, clean image gallery in one command. No php/mysql weirdness, no constant upgrades, no hassle.

Do I need another time sink? Yes, yes I do

So I crawled out of the rock I was sleeping in, and discovered that the Internet now does things aside from text and images. Yes! This fabulous new technology, called podcasting, allows some people to record themselves talking, and other people (like me) to subscribe and listen to them.

The software I use is called gPodder, and is a lovely cross-platform (it works on my n900 too!), rich application that supports subscriptions, sync, audio+video, and so on. Their sister site, gPodder.net, allows one to have their subscriptions in a single place that can be sync’d to multiple devices. You can see my subscriptions here.

I’ve already found lovely sites like Escape Pod, which does audiobook readings of scifi short stories; and discovered (via bsdtalk) that OpenBSD has an Emacs-like text editor called mg. If I had a reasonably cheap 3G plan, I’d‘ve loved to be able to stream directly to my phone during my daily commute. For now I suppose I’ll only use it from the desktop.

File management over SSH with Konqueror

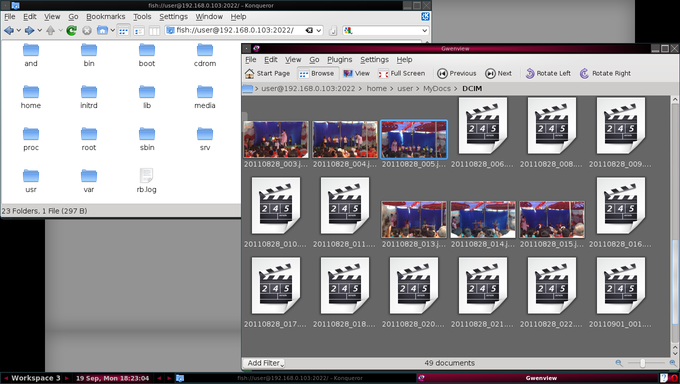
I was cleaning up and backing some pics on my phone, and needed a quick way to view and delete a bunch of them. Well I’m on linux, and KDE has always had an amazing suite of applications, so it was no surprise that there was an easy way out. Konqueror supports the ‘FISH’ protocol to transparently handle files over ssh. I just had to enter
this:

fish://user@192.168.0.103:2022

And I get a perfectly normal konqueror window that shows all the files on my phone :)

This is what it looks like:

konq_thumb

My Operating Systems Journey

Pre-2004

I started life out on a PC running DOS and Windows 3.x. This was before I had dial-up, so my memories of it are of me mostly playing with MS Paint and some old games. The box was later upgraded to one running Win95, and I spent most of my time trying out shareware programs. Most of these memories are largely forgettable, and I mourn the opportunities I missed by running a mediocre OS.


2004

My first encounter with a Real OS, when I got my first job in Bangalore. Our development environment was Solaris, and I quickly made friends with the sysadmin. There were frequent jaw-dropping moments when I caught vague glimpses of the power of the terminal. I devoured anything the admin could teach me, and was a convert from then on.

2005-2008

This was the experimentation phase, and such joyous days they were. I shipped my computer over to Bangalore and learned to dual-boot. The company I was working for had a well-stocked library, and there were a few Linux publications available that used to (and still do) release a distro in every month’s edition.

The usual process was to get a CD, run home and install it, and then get stuck immediately with something I had no idea about. These were frustrating, but ultimately rewarding days. I had a dial-up connection that I never really could configure, so I had to note down errors on a piece of paper, research them at office the next day, and write down multiple possible fixes to try when I returned.

I tried every distro I could get my hands on, and I never felt at home when I wasn’t using Slackware. This became my primary OS for quite a while. By this time I also had broadband, and life was good.

2008-Present

Once I settled with Slackware, I didn’t experiment much with other distros. But the old restlessness always comes back. I tried FreeBSD on a whim, and had another jaw dropping moment. I’d never seen anything as polished as its Ports system, and I fell in love again.

Then my trusty PC gave up in 2010 and it was time for a new box. I regrettably went with Win7 this time, and went through a brief but active gaming phase. Not wanting to dual boot, I bought a VPS and installed Debian on it. At least I always had a Linux box at my finger tips this way. This was also when I bought my Nokia N900, which runs
Maemo (a spin-off of Debian).

Most recently, I’ve installed Debian in VirtualBox, and I always run it at full screen and do all my work from within it. I also have a test installation of Linux From Scratch, and VirtualBox’s snapshots are a boon here. Debian feels solid, and I’ve never had any problems on it, either on the server or the desktop. I’m quite comfortable as a
sysadmin, but the plan now is to pick up some programming skills. I’ve got books on Assembly, C and Scheme, and I’m going through them in whatever order pleases me.
Finally went ahead with installing TrueCrypt..

..and it was embarrassingly easy. I was worried that it wouldn’t support my /home, which is a ReiserFS filesystem. I needn’t have worried: you can create Truecrypt volumes even on individual files, not just on separate partitions. Here’s how I went around doing it (on a stock Slackware 12 box, as usual):

Download and install DeviceMapper and TrueCrypt, in that order.

Touch a file called tc.txt anywhere. Mine is in /mnt. And then:
truecrypt -c /mnt/tc.txt
Follow the simple steps that appear, the defaults are pretty okay.
Then jump to the Gentoo wiki’s nice page on TrueCrypt to make an ext2 filesystem of your newly created volume.

Mount the volume to a folder using truecrypt /mnt/tc.txt /mnt/encAnd unmount using truecrypt -d

Add aliases for convenience (again, see the Gentoo wiki) to the normal user, and add that user to the sudoers list, so that a root login isn’t needed each time the TrueCrypt volume needs to e mounted.

And in less than an hour of fiddling around, I have this neat 500 MB volume, alas with nothing really secretive that I can store in it. Fun, atleast.

IPv6 on Slackware HOWTO

Okay, here’s a quick and easy HOWTO on getting IPv6 running on your Linux box. I’m using a stock Slackware 11 box, so this should work pretty much the same anywhere else (unless you already have it enabled).

Check whether or not your kernel already has the IPv6 modules loaded:

/sbin/ifconfig -a | grep inet6

Load the module and see the results:

modprobe ipv6

You should now be able to ping to localhost:

ping6 ::1
PING ::1(::1) 56 data bytes
64 bytes from ::1: icmp_seq=1 ttl=64 time=0.095 ms
64 bytes from ::1: icmp_seq=2 ttl=64 time=0.074 ms
64 bytes from ::1: icmp_seq=3 ttl=64 time=0.071 ms

If you’re behind a NAT, your best option is probably in getting a tunneling client that’ll encapsulate your v6 packets in v4 and then send them across. I found a very nice one: Freenet6’s Gateway6 client. Download the package and install it. Installation is as easy as a gmake all and a gmake install. The executable is called gw6c. A config file (gw6c.conf) is also needed.

I haven’t registered with Freenet6 yet, so I connect as an anonymous user, and an IPv6 address is given to me from a pool. I went through the guide included in the package, but I didn’t have to change a thing in the config file, and the defaults allowed me to connect to their broker.

You’re all set now! Check out the Kame website; if you see a dancing turtle, you’re all done! Just in case you’re wondering about existing IPv4 websites and such, don’t worry: Both A and AAAA DNS queries are made, so if a website is not IPv6 enabled, you’ll still be able to access it without any problems.

Further on..

This comprehensive HOWTO really gives you bucketloads of information in case you’re interested.
If you’re happy with the changes and want to make them permanent, you might want to add the modprobe ipv6 line in your /etc/rc.d/rc.modules file, and another rc file in /etc/rc.d to start your client.